We've started the next agility course before we've even finished our pre-agility course, but that's what the weather gods had in store for us. I think we suffered a bit because of it.
None of the dogs in our previous class were in this one. Buster was very excited and agitated to be around a bunch of new dogs. He wanted to meet them and play so badly.
The first thing we did was learn a front cross. You cross in front of your dog as he is walking in a straight path. Not hard.
But then we tried a front cross while our dog went through a tunnel. That would have been fine if Buster remembered tunnels. He would go in and as I'd run to meet him at the other end, he'd pop back out the entrance and follow me. This proved to be a problem over and over throughout the class.
After we all did the tunnel exercise, we then did a full sequence involving two front crosses, 2 jumps and 3 runs through tunnels. Buster did pretty well on the first run and completely fell apart on the second. He did so awful we had to go back to basics where the instructor held him at one end of the tunnel and I called him from the other end, and even then, he still just wanted to run directly towards me and not go through the tunnel.
So the lesson for me is to buy a tunnel! I'm trying to find a cheap one ($20 or less), but even on ebay that's hard to do.
Update: I purchased a Pawhut 16.4 ft Tunnel on ebay for $28. It was sturdy enough for a 65 lb dog to run through and came with a carrying case. Buster's trainer could tell the next week that he had been practicing. Never had trouble with tunnels again. Highly recommend.
Thursday, July 24, 2014
Saturday, July 19, 2014
Pre-Agility: Week 4
Week 1
Week 2
Week 3
Week 5
Week 6
It's been a while since I've posted about agility class because it's been a while since we've had agility class. Thursday evenings seem prime time for rain (which means cancellations).
Week 4 was a lot of fun. We started with sequencing, which Buster and I had been working on at home with our equipment. We did a pinwheel sequence. 3 jumps were set up in a semi-circle, like below.
Buster had no problems with this since we practice at home.
We moved on to some new equipment: the seesaw. But we didn't actually get on the seesaw. We got on what the instructor called the "teeter board". It's an unstable board that is very small and low to the ground and moves as the dog walks on it.
Buster did SO well. I thought he wouldn't like the movement, but he walked right across it. We lured our dogs across with yummy treats and the instructor pointed out that when Buster walked across the first time and felt it move, he looked down at the board to see what was going on, then refocused on the treat and continued on.
Then we finished up with practice weave pole entry. We stood next to the weave poles and pointed at them to get the dogs to go through. Nothing too hard, but weave poles are extremely difficult to teach.
Week 5 will be a private review since I couldn't go to the class make-up date. The 6th and final week will actually be AFTER our next class level begins.
Week 2
Week 3
Week 5
Week 6
It's been a while since I've posted about agility class because it's been a while since we've had agility class. Thursday evenings seem prime time for rain (which means cancellations).
Week 4 was a lot of fun. We started with sequencing, which Buster and I had been working on at home with our equipment. We did a pinwheel sequence. 3 jumps were set up in a semi-circle, like below.
 |
| Pinwheel sequence: person follows red lines and dog follows yellow |
We moved on to some new equipment: the seesaw. But we didn't actually get on the seesaw. We got on what the instructor called the "teeter board". It's an unstable board that is very small and low to the ground and moves as the dog walks on it.
 |
| Teeter Trainer |
Then we finished up with practice weave pole entry. We stood next to the weave poles and pointed at them to get the dogs to go through. Nothing too hard, but weave poles are extremely difficult to teach.
Week 5 will be a private review since I couldn't go to the class make-up date. The 6th and final week will actually be AFTER our next class level begins.
Saturday, July 12, 2014
DIY Agility Equipment: Tire Jump
Previously, I built an Agility Bar Jump.
Next on the list of Do-It-Yourself Dog Agility Equipment is the Tire Jump.
There are a couple different plans for the tire jump. I sorted through all of them and tried to weigh the pros and cons of each.
The Tire
An AKC competition tire jump should have an opening diameter of 24" and the wall should be 3-8 inches thick. The most popular material for a do-it-yourself tire is drainage pipe. This is lightweight so if a dog knocks his feet against it, it will not injure him. It's also easily shaped and commonly duct taped together. (More about duct-tape at the end).
The Frame
As I mentioned above, there are many different styles of Tire Jumps. I will show you what I found and then discuss what I chose.
This is what a competition tire jump looks like and retails for upwards of $130:
It looks more complicated than it is. The wires allow you to adjust the tire height. The tire should be almost to the ground, regardless of dog height, when introducing this equipment to your dog. Gradually go up to full height (which is measured from the ground to the bottom of the tire opening).
I found several instruction pages similar to this style:
These directions are fairly simple:
This instruction page is pretty popular. Not being mechanically inclined I found it to be confusing.
The final instruction page is from a message board, but had the instructions I liked the best.
The next style of Tire Jump is much simpler. It does not involve hanging wires, just a frame and attaching the tire in whatever way is convenient, often bungee cords or duct tape if your tire will be in a fixed position.
These instructions are just for the frame. You would attach the tire inside the rectangle.
These instructions attach the tire with bungee cords. It's not hanging from wires.
I wouldn't go through the trouble of building the tire like they did, but if you use drainage pipe, your dimensions for the PVC frame may be different than theirs.
Weighing the options
Since we are building our own equipment, it's all much cheaper than store bought. We could build a very affordable competition style jump. It's best if your dog uses equipment that looks like what he will be competing on.
However, Buster and I do not have a fenced in backyard of our own. A friend here in Greensboro has offered to let us use her yard and we will also be using my parent's yard 45 minutes away in Clemmons. Therefore our equipment has to be lightweight and easy to transport.
After much thought, we settled on this style, which is not competition style but will allow us to travel with it.
With a little experience under my belt building an Agility Jump I was able to eyeball this and see how simple it is. It retails for $75 at Affordable Agility.
Here is how simple it is:
How to build
1 inch PVC pipe in the follow lengths:
four 15" pipes
two 50" pipes
one 30" pipe
6 1-inch cap ends
two-four bungees (or another way to secure 'tire' to pipe)
2 4-way tees*
8-feet of 4-inch diameter drainage pipe
*Note: The 4-way tees can be difficult to find. I bought them online from home depot and had them shipped to the store for free. Two 4-way tees with tax and free shipping cost me $4.93. (They come in different sizes. Be sure you order the same size as your PVC pipes)
The 15" pipes are the feet, the 30" pipe is the bottom cross bar, and the two 50" bars are the vertical bars you attach the tire to.
Attach your tire between the two 50" PVC pipes with bungee cord. The tire height can be adjusted by just sliding it up and down the poles.
Price
2 10' 1"diameter PVC pipes $6.80
6 1" PVC caps $3.96
8' Flex Drainage Pipe $5.78
2 4-way tees $4.93
8-pack of Bungees $2.47
Total price $19.40
(The blue and yellow duct tape was $3.57 each, but I didn't apply it to this project's cost because the duct tape is being used on several pieces of equipment.) *see below about colors*
As you can see in my finished pics, the tire is not perfectly round, but it's pretty darn close. It was very difficult to get it rounded and stay within the 24" diameter guideline all around. If you have better luck with a perfect drainage pipe circle, comment with your secret.
Tire Jump In Action
Here's a video of Buster using both his (as yet undecorated) tire jump and bar jump in a sequence.
Decorating your Tire Jump (the duct tape info I mentioned earlier)
Dogs can see colors. But whereas we have 3 cones (red, blue and yellow) and can see the whole rainbow, dogs only have two (blue and yellow) and can only see those shades and some brownish and gray.
When decorating any of your equipment, you want it to stand out and be visible. This is why so much dog agility equipment is blue and yellow. And these are the colors I use for all my equipment.
More about dog's color vision in the sport of agility here.
Next on the list of Do-It-Yourself Dog Agility Equipment is the Tire Jump.
There are a couple different plans for the tire jump. I sorted through all of them and tried to weigh the pros and cons of each.
The Tire
An AKC competition tire jump should have an opening diameter of 24" and the wall should be 3-8 inches thick. The most popular material for a do-it-yourself tire is drainage pipe. This is lightweight so if a dog knocks his feet against it, it will not injure him. It's also easily shaped and commonly duct taped together. (More about duct-tape at the end).
The Frame
As I mentioned above, there are many different styles of Tire Jumps. I will show you what I found and then discuss what I chose.
This is what a competition tire jump looks like and retails for upwards of $130:
 |
| Courtesy AffordableAgility.com |
I found several instruction pages similar to this style:
These directions are fairly simple:
 |
| Finished product from dogplay.com |
 |
| Finished product from Campbandy.com |
 |
| Finished product from dogden.proboards.com |
These instructions are just for the frame. You would attach the tire inside the rectangle.
 |
| Finished product from caninecrib.com |
I wouldn't go through the trouble of building the tire like they did, but if you use drainage pipe, your dimensions for the PVC frame may be different than theirs.
 |
| Finished product from make-and-build-dog-stuff.com |
Since we are building our own equipment, it's all much cheaper than store bought. We could build a very affordable competition style jump. It's best if your dog uses equipment that looks like what he will be competing on.
However, Buster and I do not have a fenced in backyard of our own. A friend here in Greensboro has offered to let us use her yard and we will also be using my parent's yard 45 minutes away in Clemmons. Therefore our equipment has to be lightweight and easy to transport.
After much thought, we settled on this style, which is not competition style but will allow us to travel with it.
 |
| $75 from AffordableAgility.com |
Here is how simple it is:
 |
| I have awesome MS Paint skills |
How to build
1 inch PVC pipe in the follow lengths:
four 15" pipes
two 50" pipes
one 30" pipe
6 1-inch cap ends
two-four bungees (or another way to secure 'tire' to pipe)
2 4-way tees*
8-feet of 4-inch diameter drainage pipe
*Note: The 4-way tees can be difficult to find. I bought them online from home depot and had them shipped to the store for free. Two 4-way tees with tax and free shipping cost me $4.93. (They come in different sizes. Be sure you order the same size as your PVC pipes)
The 15" pipes are the feet, the 30" pipe is the bottom cross bar, and the two 50" bars are the vertical bars you attach the tire to.
Attach your tire between the two 50" PVC pipes with bungee cord. The tire height can be adjusted by just sliding it up and down the poles.
Price
2 10' 1"diameter PVC pipes $6.80
6 1" PVC caps $3.96
8' Flex Drainage Pipe $5.78
2 4-way tees $4.93
8-pack of Bungees $2.47
Total price $19.40
(The blue and yellow duct tape was $3.57 each, but I didn't apply it to this project's cost because the duct tape is being used on several pieces of equipment.) *see below about colors*
As you can see in my finished pics, the tire is not perfectly round, but it's pretty darn close. It was very difficult to get it rounded and stay within the 24" diameter guideline all around. If you have better luck with a perfect drainage pipe circle, comment with your secret.
 |
| Undecorated |
 |
| Decorated (with Buster in the center) |
Tire Jump In Action
Here's a video of Buster using both his (as yet undecorated) tire jump and bar jump in a sequence.
Decorating your Tire Jump (the duct tape info I mentioned earlier)
Dogs can see colors. But whereas we have 3 cones (red, blue and yellow) and can see the whole rainbow, dogs only have two (blue and yellow) and can only see those shades and some brownish and gray.
 |
| Human color spectrum |
 |
| Dog color spectrum |
More about dog's color vision in the sport of agility here.
Friday, July 11, 2014
JoAnn Fabric Sewing Class Review: Basics
Intro
I decided to use my last free summer to learn a skill I've always wanted to have: sewing. I'm not into reality shows but I always enjoyed watching the creative process on Project Runway. Not sure I'll ever have the vision to create a garment from imagination, but I hope to be able to follow a pattern or at least hem.
This will be a 4-part series as I have signed up for 4 classes: basics, zippers, bear, and skirt. All classes are taken at the store at 4644 W Market St. Greensboro, NC 27407-1285
(336)299-6336
Previous Experience
The only sewing experience I have is from 7th grade home-ec where we learned to sew pillows. I made lots of pillows for presents after that. It's been so long that I don't even remember how to thread a machine.
Supply List
1 yard cotton fabric
1 yard fusible interfacing
All-purpose thread
Sewing shears
straight pins
pin cushion
seam ripper
Basics Class Description
The Basics Class is 2.5 hours long. The instructor is Anna Berry. I used a 50% off coupon and paid $17.50 for the class. All the materials were supplied for me except for the seam ripper, which I already had.
We were allowed to go out in the store and grab any fabric square we wanted for our project which would be a drawstring bag.
The objectives of the class are:
"Learn basic sewing skills
Sewing machine and tool basics
Sewing seams and terminology"
Basics Class Review
Is the class worth it? Definitely!
There were 3 people in the class, one of which was a pre-teen but she was quiet and polite. Us two adults brought our own machines but our instructor had us use the store's machines first and after we completed our project she helped us familiarize ourselves with our own machines.
The store's machines are NICE! They're fully digital and run about $350. When I got on my machine later I felt like I was using a hunk of junk compared to theirs.
My experience began with threading the bobbin. After that we had 3 sheets of papers to sew. Yes, we sewed printer paper. The first one was straight lines that we just sewed up and down, practicing. Then we sewed a sheet of paper with squares and corners printed on it. Then we sewed a piece of paper with a huge spiral printed on it. Sewing paper is a little harder than fabric, but I appreciated the practice and felt it was a useful exercise.
After the paper, we moved on to scrap fabric. The instructor encouraged us to explore the different types of stitches on the machines, which we did. There were some gorgeous stitches on those machines, including one that looked like a vine of flowers. (My personal machine doesn't have that, of course. It's too fancy a stitch.) She showed us how the machine makes button holes as well. The store's fancy machines automatically detect the size of button hole you need.
Then we moved on to the real thing. We ironed our fabric and we started sewing the pouch where our drawstring goes. (step seen in picture above) Then we straight sewed the sides and bottom and we did a fancy zipzag stitch over top of it so it looked nice, even though it's just the inside. We did a fancy thing with the corners to make them angled so the bag isn't flat.
I was very pleased with how the class turned out. The instructor was patient and showed us the more intricate steps individually. She was very helpful and I walked out feeling like I had learned a lot. I'm looking forward to my upcoming courses at this location.
I decided to use my last free summer to learn a skill I've always wanted to have: sewing. I'm not into reality shows but I always enjoyed watching the creative process on Project Runway. Not sure I'll ever have the vision to create a garment from imagination, but I hope to be able to follow a pattern or at least hem.
This will be a 4-part series as I have signed up for 4 classes: basics, zippers, bear, and skirt. All classes are taken at the store at 4644 W Market St. Greensboro, NC 27407-1285
(336)299-6336
Previous Experience
The only sewing experience I have is from 7th grade home-ec where we learned to sew pillows. I made lots of pillows for presents after that. It's been so long that I don't even remember how to thread a machine.
Supply List
1 yard cotton fabric
1 yard fusible interfacing
All-purpose thread
Sewing shears
straight pins
pin cushion
seam ripper
Basics Class Description
The Basics Class is 2.5 hours long. The instructor is Anna Berry. I used a 50% off coupon and paid $17.50 for the class. All the materials were supplied for me except for the seam ripper, which I already had.
 |
| My free supplies from JoAnn |
We were allowed to go out in the store and grab any fabric square we wanted for our project which would be a drawstring bag.
The objectives of the class are:
"Learn basic sewing skills
Sewing machine and tool basics
Sewing seams and terminology"
Basics Class Review
Is the class worth it? Definitely!
There were 3 people in the class, one of which was a pre-teen but she was quiet and polite. Us two adults brought our own machines but our instructor had us use the store's machines first and after we completed our project she helped us familiarize ourselves with our own machines.
The store's machines are NICE! They're fully digital and run about $350. When I got on my machine later I felt like I was using a hunk of junk compared to theirs.
 |
| The store's nice digital sewing machine |
 |
| I had some issues with corners on the paper on the right before I learned how best to do it |
Then we moved on to the real thing. We ironed our fabric and we started sewing the pouch where our drawstring goes. (step seen in picture above) Then we straight sewed the sides and bottom and we did a fancy zipzag stitch over top of it so it looked nice, even though it's just the inside. We did a fancy thing with the corners to make them angled so the bag isn't flat.
 |
| It was hard to capture the hard work I put into the bag in a photograph |
I was very pleased with how the class turned out. The instructor was patient and showed us the more intricate steps individually. She was very helpful and I walked out feeling like I had learned a lot. I'm looking forward to my upcoming courses at this location.
Wednesday, July 9, 2014
Carolina Theatre Summer Film Festival 2014
Every year the Carolina Theatre in downtown Greensboro puts on a Summer Film Festival. They show older movies M-F for several weeks. They also show kids movies during the day.
The movies I've selected this year are Friday the 13th, Psycho, Jaws, The Sandlot, A Troll in Central Park and Fern Gully 2. Being a nanny I get to enjoy the kids movies while I'm on the clock.
The Carolina Theatre is a beautiful restored theatre that puts on a wide variety of entertainment, including movies, bands, dance performances, and stand up comedy to name a few. I saw the Nutcracker performed there in '10.
I will update this post as I attend the movies listed above.
The Sandlot
Tuesday, June 24
This movie was part of the Summer Swim-In series sponsored by the local swim teams. The teams all have meets on Tuesday so it's a good way to entertain the kids without wearing them out.
I'd seen this movie before, but it had been a long time. I'm not sure I actually sat down and watched it from start to finish before. I was surprised with the amount of cussing in the movie (several instances of the S-word) and concerned because of the young age of the viewing audience (some of the kids were 5). But overall it's a classic kids movie.
Friday the 13th
Tuesday, June 8
I had never seen this movie but I attended with two horror movie buffs. I don't generally like horror movies, but I didn't find this one scary so I was ok. I thought it was interesting to frame the movie in a way that sometimes the camera view represented the killer's view. The suspenseful music whenever something sinister was about to happen reminded me of Jaws.
I didn't even realize Kevin Bacon was in the movie for a while. He looked so young! The actress that survived the movie was probably the worst actress of the whole movie. Her movements and reactions were a little stilted sometimes.
Overall it was an enjoyable film and an interesting look at the horror genre before so much of it became cliche.
 Psycho
Monday, July 28
I'd never seen the beginning of the movie so I never got the murder victim's backstory for why she was at the hotel. Great movie!
 Jaws
Jaws
Thursday, July 31
All time favorite movie. Everyone always applauds when the shark gets blown up. If that's a spoiler for you, we can not be friends anymore.

The movies I've selected this year are Friday the 13th, Psycho, Jaws, The Sandlot, A Troll in Central Park and Fern Gully 2. Being a nanny I get to enjoy the kids movies while I'm on the clock.
The Carolina Theatre is a beautiful restored theatre that puts on a wide variety of entertainment, including movies, bands, dance performances, and stand up comedy to name a few. I saw the Nutcracker performed there in '10.
I will update this post as I attend the movies listed above.
The Sandlot
Tuesday, June 24
This movie was part of the Summer Swim-In series sponsored by the local swim teams. The teams all have meets on Tuesday so it's a good way to entertain the kids without wearing them out.
I'd seen this movie before, but it had been a long time. I'm not sure I actually sat down and watched it from start to finish before. I was surprised with the amount of cussing in the movie (several instances of the S-word) and concerned because of the young age of the viewing audience (some of the kids were 5). But overall it's a classic kids movie.
Friday the 13th
Tuesday, June 8
I had never seen this movie but I attended with two horror movie buffs. I don't generally like horror movies, but I didn't find this one scary so I was ok. I thought it was interesting to frame the movie in a way that sometimes the camera view represented the killer's view. The suspenseful music whenever something sinister was about to happen reminded me of Jaws.
I didn't even realize Kevin Bacon was in the movie for a while. He looked so young! The actress that survived the movie was probably the worst actress of the whole movie. Her movements and reactions were a little stilted sometimes.
Overall it was an enjoyable film and an interesting look at the horror genre before so much of it became cliche.
Monday, July 28
I'd never seen the beginning of the movie so I never got the murder victim's backstory for why she was at the hotel. Great movie!

Thursday, July 31
All time favorite movie. Everyone always applauds when the shark gets blown up. If that's a spoiler for you, we can not be friends anymore.

Thursday, July 3, 2014
PTA Orientation
Yesterday I had a 2.5 hr orientation for PTA school. I was very early for it because I stopped by Financial Aid first to see what the latest incompetence was for why I didn't have any funds 6 months after applying (another story).
There was one other person in the room when I peeked in and she looked friendly, so I sat next to her and talked to her. I made a friend (yay) which everyone kept emphasizing was SO important for getting through PTA school. (more on that later)
Faculty and staff integral to the PTA program introduced themselves first, although there are only two professors for the entire program. Then 4 current students of the class of 2014 introduced themselves and gave us a tour of the rooms we'd be using. They also gave us an idea of what classes/professors would be like from a student's perspective and gave us little tips and tricks to be successful.
We went back to the original classroom and the program director went over a handbook and discussed all the important, and sometimes boring, info. I left the orientation feeling like crying because I was so overwhelmed and intimidated.
Why I'm terrified
Everyone emphasized how important it is to become friends with the classmates you will spend the next 1.5 years with and that study groups are essential. The problem is that I don't study well in a group setting. I have attempted study groups in the past and gotten almost nothing out of them. I have to sit at home alone and do it all myself to be able to memorize information. I'm concerned that I'm going to alienate myself from everyone else that likes study groups because they'll think I'm unsocial.
So the theme of this post is that this is gonna be really really hard and I'm really really nervous. I hope I come back to this post a year and a half later, after graduation, and laugh at myself.
There was one other person in the room when I peeked in and she looked friendly, so I sat next to her and talked to her. I made a friend (yay) which everyone kept emphasizing was SO important for getting through PTA school. (more on that later)
Faculty and staff integral to the PTA program introduced themselves first, although there are only two professors for the entire program. Then 4 current students of the class of 2014 introduced themselves and gave us a tour of the rooms we'd be using. They also gave us an idea of what classes/professors would be like from a student's perspective and gave us little tips and tricks to be successful.
We went back to the original classroom and the program director went over a handbook and discussed all the important, and sometimes boring, info. I left the orientation feeling like crying because I was so overwhelmed and intimidated.
Why I'm terrified
- If you make less than an 80 on a skills test or practical exam, you fail and are kicked out of the program. (You're allowed one retake only)
- Less than 75 on a written exam is failing.
- I must disrobe and wear only a sports bra and very short shorts for labs. No exceptions.
- Out of the 24 students that began the class last year, only 17 remain. 1 was at my orientation attempting to repeat the program.
- THERE IS A TEST THE FIRST WEEK on medical terminology and abbreviations. We are expected to study this over the summer...before the program begins.
- We are expected to give presentations not only to the class but also to the professionals at our clinical sites.
- Some of our practical exams will be videotaped for the whole class to watch.
Everyone emphasized how important it is to become friends with the classmates you will spend the next 1.5 years with and that study groups are essential. The problem is that I don't study well in a group setting. I have attempted study groups in the past and gotten almost nothing out of them. I have to sit at home alone and do it all myself to be able to memorize information. I'm concerned that I'm going to alienate myself from everyone else that likes study groups because they'll think I'm unsocial.
So the theme of this post is that this is gonna be really really hard and I'm really really nervous. I hope I come back to this post a year and a half later, after graduation, and laugh at myself.
Wednesday, July 2, 2014
DIY Agility Equipment: Bar Jump
Buster is doing well in his agility classes, but I feel that he would get more out of them if we were able to practice at home. So I've been googling how to make your own equipment (because store-bought equipment is expensive).
So far I've found a do-it-yourself for jumps, A-frame, tires and weave poles that I think are doable.
The easiest seemed to be the jump, just required fitting together PVC pipes, so I started there.
I used this as my guide:
Instructables Dog Agility Jump
Video Here
The guy from those instructions did all his own cutting. I just went into Home Depot with my list and asked them to cut the 1" PVC:
two 4-foot pipes
two 3-foot pipes
four 18-inch pipes
I even got the guy to cut the tee-joint. I had him cut the back off and then cut it in half. These clip on to the pipes and make cups that hold the jump bar, allowing it to be knocked off if the dog's foot hits it (thereby preventing injury to your dog).
My tee-joint doesn't snap on like the guy's in the video. I'm using a metal clamp. I can tighten and untighten when I want to adjust the jump height. (Buster's jump height is 24" AKC and 26" USDAA.)
I added some blue and yellow stripes with duct tape for visibility (see this link for info about dog's color vision and agility).
The materials I used (all 1" PVC) and prices:
two 4-foot pipes
two 3-foot pipes $3.44 for 10' of pipe
four 18-inch pipes
6 cap ends .66 per cap
1 tee (cut up for the jump cups) I didn't get rung up for this...so free!
2 4-way tees (special ordered from Home Depot's website for $2.31 each + free shipping)
2 clamps .97 each
The cost for building this regulation sized* jump was about $15. Even I can afford that!
*This jump is within AKC standards. Regulations state the jump must be made from 1" PVC, 4-5 ft long (mine is 4 feet), and at least 32" tall (mine is 36"). (Pg 36) *
Here's a picture of the jump in a much prettier setting than my back patio. Please excuse my ghetto duct taping.

And a video of my dog, Buster's, very first agility sequence, also showing the tire jump.
Next up is the Tire Jump!
So far I've found a do-it-yourself for jumps, A-frame, tires and weave poles that I think are doable.
The easiest seemed to be the jump, just required fitting together PVC pipes, so I started there.
I used this as my guide:
Instructables Dog Agility Jump
Video Here
The guy from those instructions did all his own cutting. I just went into Home Depot with my list and asked them to cut the 1" PVC:
two 4-foot pipes
two 3-foot pipes
four 18-inch pipes
I even got the guy to cut the tee-joint. I had him cut the back off and then cut it in half. These clip on to the pipes and make cups that hold the jump bar, allowing it to be knocked off if the dog's foot hits it (thereby preventing injury to your dog).
My tee-joint doesn't snap on like the guy's in the video. I'm using a metal clamp. I can tighten and untighten when I want to adjust the jump height. (Buster's jump height is 24" AKC and 26" USDAA.)
I added some blue and yellow stripes with duct tape for visibility (see this link for info about dog's color vision and agility).
The materials I used (all 1" PVC) and prices:
two 4-foot pipes
two 3-foot pipes $3.44 for 10' of pipe
four 18-inch pipes
6 cap ends .66 per cap
1 tee (cut up for the jump cups) I didn't get rung up for this...so free!
2 4-way tees (special ordered from Home Depot's website for $2.31 each + free shipping)
2 clamps .97 each
The cost for building this regulation sized* jump was about $15. Even I can afford that!
*This jump is within AKC standards. Regulations state the jump must be made from 1" PVC, 4-5 ft long (mine is 4 feet), and at least 32" tall (mine is 36"). (Pg 36) *
 |
| Dimensions. Notice the 6 cap ends as well as the metal clamps. |
Here's a picture of the jump in a much prettier setting than my back patio. Please excuse my ghetto duct taping.
And a video of my dog, Buster's, very first agility sequence, also showing the tire jump.
Next up is the Tire Jump!
Sunday, June 29, 2014
Stand Up Paddleboard Yoga
Update: The company I did this with has moved to Daytona, FL.
Today I tried Stand Up Paddleboard Yoga. I am officially insane.
It was offered through Yogini SUP Adventures.
Their facebook page is here.
Their webpage is here.
Today's 2-hour adventure took place at Lake Brandt. I had never been on a stand up paddleboard, but I had been wanting to. It looks like a surfboard. I was very nervous and thought it would be more stable because the board is so large. But you have to be very aware of your movements at all times. It can be very easy to get disoriented and fall in.
We paddled for a long time out to a quiet corner of the lake. My feet actually started to hurt pretty bad, so I was glad when we finally got in place, dropped anchor and sat down.
You need to be familiar with yoga before you do this. She names off poses and goes very quickly so if you don't know them, you'll have a difficult time trying to watch people, copy the pose AND stay balanced on your board.
I started doing yoga about 12 years ago. I took some group classes at the YMCA
We did standing flow poses and just going from a seated to a standing position is difficult. We did back and core strengtheners, warrior poses and lots of vinyasa flows (upward facing dog feels so good!). Sometimes while on all fours we had to lift a leg off the board...sometimes both an arm and a leg.
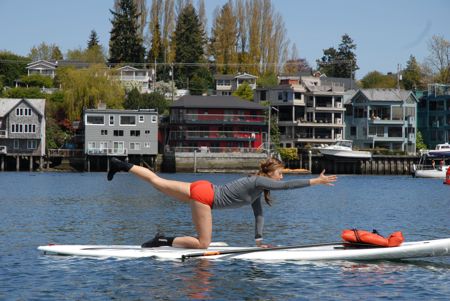
The two most difficult parts were the warrior poses (because of the difficulty in getting into the proper position while maintaining balance) and tree pose.
When she said we were going to do tree pose I about freaked. I said there's no way I can balance on one foot on this board. But our tree poses consisted of getting our feet to the middle of the board, slightly lifting one foot off the board and resting the lifted foot's heel on the stable foot's ankle. Seems silly on land, but on the SUP it was extremely difficult.
I managed to not fall in, even at the end when I was coasting onto shore and hit a rock. I don't know how I maintained my balance, but I did. Luckily it's a sturdy board. (YOLO brand)
As I sit here, sore all over (but mostly in the shoulder/back area) I am glad that I tried out such a difficult activity. It was actually much harder than I thought it would be, but I enjoyed it. I definitely recommend Yogini SUP Adventures to someone that enjoys yoga and wants to expand their practice, or someone who just wants to try something new (but still has some yoga experience)! It was only $20, which is only a little more than a land-lubber's yoga class.
Can't do yoga? They also offer guided SUP tours as well as SUP meditation. Your child can even ride on your SUP with you!
Today I tried Stand Up Paddleboard Yoga. I am officially insane.
It was offered through Yogini SUP Adventures.
Their facebook page is here.
Their webpage is here.
Today's 2-hour adventure took place at Lake Brandt. I had never been on a stand up paddleboard, but I had been wanting to. It looks like a surfboard. I was very nervous and thought it would be more stable because the board is so large. But you have to be very aware of your movements at all times. It can be very easy to get disoriented and fall in.
We paddled for a long time out to a quiet corner of the lake. My feet actually started to hurt pretty bad, so I was glad when we finally got in place, dropped anchor and sat down.
You need to be familiar with yoga before you do this. She names off poses and goes very quickly so if you don't know them, you'll have a difficult time trying to watch people, copy the pose AND stay balanced on your board.
I started doing yoga about 12 years ago. I took some group classes at the YMCA
We did standing flow poses and just going from a seated to a standing position is difficult. We did back and core strengtheners, warrior poses and lots of vinyasa flows (upward facing dog feels so good!). Sometimes while on all fours we had to lift a leg off the board...sometimes both an arm and a leg.
The two most difficult parts were the warrior poses (because of the difficulty in getting into the proper position while maintaining balance) and tree pose.
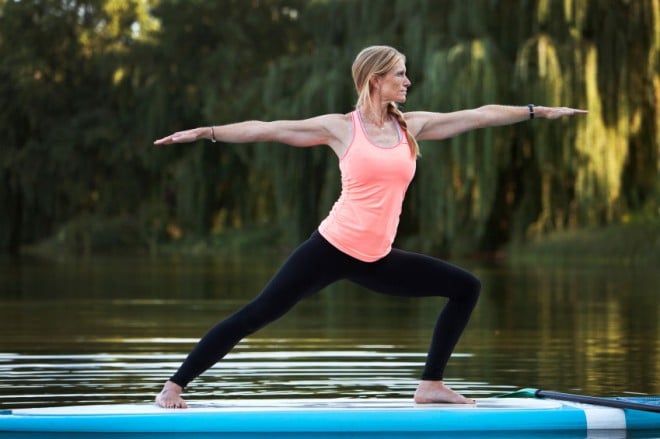 |
| SUP Warrior Pose |
When she said we were going to do tree pose I about freaked. I said there's no way I can balance on one foot on this board. But our tree poses consisted of getting our feet to the middle of the board, slightly lifting one foot off the board and resting the lifted foot's heel on the stable foot's ankle. Seems silly on land, but on the SUP it was extremely difficult.
 |
| Looks like this but we didn't have our paddles to stabilize us |
As I sit here, sore all over (but mostly in the shoulder/back area) I am glad that I tried out such a difficult activity. It was actually much harder than I thought it would be, but I enjoyed it. I definitely recommend Yogini SUP Adventures to someone that enjoys yoga and wants to expand their practice, or someone who just wants to try something new (but still has some yoga experience)! It was only $20, which is only a little more than a land-lubber's yoga class.
Can't do yoga? They also offer guided SUP tours as well as SUP meditation. Your child can even ride on your SUP with you!
Saturday, June 28, 2014
Agility Workshop: Foundations & Fun Tricks
Buster and I are serious about Agility so when we saw his instructor at Dog-Gone Fun was offering a 2-hour workshop for beginners, we signed up real quick.
There were two other people in the workshop, both of whom had more experience than us, but we held our own.
We worked on handling (directing our dogs with our hands) as well as accelerating and decelerating. We get into a runner's stance, leaning forward with legs apart and bent, and this is the body signal to let your dog know to accelerate. Then we stand upright with legs together to signal deceleration.
When it came time to having our dogs back up onto an incline Buster fell apart. He refuses to back up straight, or to get on that incline. We ended up having to put barriers on both sides of him so he couldn't curve his body. Eventually his back feet made contact with the incline.
We've been practicing this on the stairs at my house. It's a little difficult because of how little space there is. But he's put his back feet up on the stairs, although not consistently. He seems very stressed when we try to practice it, too. His ears go down and he wants to get away. We'll see how he progresses.
We also did some exercises where our dogs had to step onto a paint can and into a box. Eventually our dogs should put both front paws on the paint cans and then step in a circle around it, as well as putting all 4 feet into a small cardboard box.
This workshop has given us a lot to work on. We're progressing very slowly in Pre-Agility and doing things Buster and I can't practice at home, so we're glad to have more things to work on. The goal of the workshop was to teach our dogs body awareness and conditioning.
I also told the instructor that we are serious about competing and she said that it takes at least a year. I told her we were interested in participating in the Triad Dog Games next year. We have a lot to work on in that year, though. But Buster and I worked hard and excelled at obedience and we will work hard and excel at this.
With some equipment at home to practice on we will definitely progress faster. Check my other blog posts for instructions on DIY agility equipment.
There were two other people in the workshop, both of whom had more experience than us, but we held our own.
We worked on handling (directing our dogs with our hands) as well as accelerating and decelerating. We get into a runner's stance, leaning forward with legs apart and bent, and this is the body signal to let your dog know to accelerate. Then we stand upright with legs together to signal deceleration.
When it came time to having our dogs back up onto an incline Buster fell apart. He refuses to back up straight, or to get on that incline. We ended up having to put barriers on both sides of him so he couldn't curve his body. Eventually his back feet made contact with the incline.
We've been practicing this on the stairs at my house. It's a little difficult because of how little space there is. But he's put his back feet up on the stairs, although not consistently. He seems very stressed when we try to practice it, too. His ears go down and he wants to get away. We'll see how he progresses.
 |
| Not Buster but an incredible likeness |
We also did some exercises where our dogs had to step onto a paint can and into a box. Eventually our dogs should put both front paws on the paint cans and then step in a circle around it, as well as putting all 4 feet into a small cardboard box.
This workshop has given us a lot to work on. We're progressing very slowly in Pre-Agility and doing things Buster and I can't practice at home, so we're glad to have more things to work on. The goal of the workshop was to teach our dogs body awareness and conditioning.
I also told the instructor that we are serious about competing and she said that it takes at least a year. I told her we were interested in participating in the Triad Dog Games next year. We have a lot to work on in that year, though. But Buster and I worked hard and excelled at obedience and we will work hard and excel at this.
With some equipment at home to practice on we will definitely progress faster. Check my other blog posts for instructions on DIY agility equipment.
Pre-Agility: Week 3
For week 1 click here.
For week 2 click here.
We missed last week because of weather, but this week the weather was great, although hot.
We worked on the chute again. Buster had trouble remembering what to do at first. But after we showed him, he RAN through the chute as fast as he could.
Then we did the tire again. First I put him on one side, stood on the other side and called him through. But then I stood next to Buster and ran with him and tried to signal for him to go through the tire. He went around the obstacle, not through it. After some work we got him through.
Then we did some more 2-on-2-off work on the obstacle, which Buster excelled at because we were able to practice that.
I think it's time I attempt to make some backyard equipment so Buster can practice at home. More posts on that later!
For week 2 click here.
We missed last week because of weather, but this week the weather was great, although hot.
We worked on the chute again. Buster had trouble remembering what to do at first. But after we showed him, he RAN through the chute as fast as he could.
Then we did the tire again. First I put him on one side, stood on the other side and called him through. But then I stood next to Buster and ran with him and tried to signal for him to go through the tire. He went around the obstacle, not through it. After some work we got him through.
Then we did some more 2-on-2-off work on the obstacle, which Buster excelled at because we were able to practice that.
 |
| example of 2-on-2-off |
Saturday, June 14, 2014
PTA Acceptance
I first decided to begin the journey of getting into Physical Therapy Assisting school at GTCC in the summer of 2011. My friend, Lauren, became a CNA and encouraged me to get into the medical field. We looked at what GTCC offered and since I'm queasy about blood, needles, and bodily fluids, I chose physical therapy assisting. I wish I had a better story, like it was my childhood dream or some traumatic event happened and I decided to make a difference. But no, I wanted a secure job that will allow me to be self sufficient.
I underestimated how difficult it would be to get into the program. Having a Bachelor's Degree in Classical Civilizations from UNCG, I had most of the requirements. I took Developmental Psychology, Personal Communications, both online, and the two harder classes: Physics and Anatomy.
I started first with Anatomy and Physiology 1 in Fall 2011. I thought the hardest class I would ever take was Historical Linguistics I took at UNCG my last semester. (We had to recreate languages that may or may not have existed based on what we knew about language patterns...oh and write a 10-page paper). I was wrong. Anatomy is the hardest class you will ever take. I learned it, too late.
So I took Anatomy 1 and somehow managed a B without learning anything. Anatomy 2 was another story.
I ended up taking Anatomy 1 twice and Anatomy 2 three times. GTCC is the hardest place you can take Anatomy, and I learned it too late. You have to take Anatomy 1 & 2 at the same school. After I only managed Bs in both, I decided to start all over at Randolph Community College in Asheboro. It was a 40 min commute and I drove down there 3 times a week (10:30a on M & F and 8a on W) for 2 semesters. I got a 104 in Anatomy 1 and a 105 in Anatomy 2. The class was SO much easier. That's not to say I didn't work hard. I did. But it was just SO MUCH EASIER.
I took Physics Spring 2013. I actually forgot to pay for my class (first time it ever happened) and I got dropped. The only class available after I found out was on Saturdays. So I sacrificed my Saturday afternoons for 5 months to take Physics, which was a bitch. But I managed to make As in the lecture and lab and was on my way!
After getting As in all my required classes the only thing left to tackle was the TEAS test (Test of Essential Academic Skills). It tests your knowledge of reading comprehension, grammar, math (mostly arithmetic and algebra), chemistry, biology, anatomy, etc. I worried about that test for about 7 months. I bought study material and went through most of it. I purchased the online practice tests for $40. I made a 70 on the practice test. I needed an 86.
It was coming down to the deadline for applying (June 5) so on June 2 I said "what the hell...I can take it twice in 2 months. I'll go take it today and if I do badly, I'll study and take it again June 4." So I sucked it up, went and took the test and when I finished I saw the score "64"...and my stomach dropped. But then I realized that was the national average and right above it was my score: 86.7. I said to myself "That's too good to be true. It can't be right." I went and checked out of the testing center and the woman said "You made an 86.7". I almost started crying. I was shaking I was so happy. I immediately went and applied to the program.
A week later an envelope arrives at my parent's house. I get there the next day and open it up. I read one word "Congratulations", then stop reading and start screaming and jumping up and down. My mom comes over to me and I hug her and start crying tears of joy. It finally happened.
So I start calling and texting everyone who had been part of my journey. It still feels surreal. I dreamed of this for so long and now...it's finally happening.
I underestimated how difficult it would be to get into the program. Having a Bachelor's Degree in Classical Civilizations from UNCG, I had most of the requirements. I took Developmental Psychology, Personal Communications, both online, and the two harder classes: Physics and Anatomy.
I started first with Anatomy and Physiology 1 in Fall 2011. I thought the hardest class I would ever take was Historical Linguistics I took at UNCG my last semester. (We had to recreate languages that may or may not have existed based on what we knew about language patterns...oh and write a 10-page paper). I was wrong. Anatomy is the hardest class you will ever take. I learned it, too late.
So I took Anatomy 1 and somehow managed a B without learning anything. Anatomy 2 was another story.
I ended up taking Anatomy 1 twice and Anatomy 2 three times. GTCC is the hardest place you can take Anatomy, and I learned it too late. You have to take Anatomy 1 & 2 at the same school. After I only managed Bs in both, I decided to start all over at Randolph Community College in Asheboro. It was a 40 min commute and I drove down there 3 times a week (10:30a on M & F and 8a on W) for 2 semesters. I got a 104 in Anatomy 1 and a 105 in Anatomy 2. The class was SO much easier. That's not to say I didn't work hard. I did. But it was just SO MUCH EASIER.
I took Physics Spring 2013. I actually forgot to pay for my class (first time it ever happened) and I got dropped. The only class available after I found out was on Saturdays. So I sacrificed my Saturday afternoons for 5 months to take Physics, which was a bitch. But I managed to make As in the lecture and lab and was on my way!
After getting As in all my required classes the only thing left to tackle was the TEAS test (Test of Essential Academic Skills). It tests your knowledge of reading comprehension, grammar, math (mostly arithmetic and algebra), chemistry, biology, anatomy, etc. I worried about that test for about 7 months. I bought study material and went through most of it. I purchased the online practice tests for $40. I made a 70 on the practice test. I needed an 86.
It was coming down to the deadline for applying (June 5) so on June 2 I said "what the hell...I can take it twice in 2 months. I'll go take it today and if I do badly, I'll study and take it again June 4." So I sucked it up, went and took the test and when I finished I saw the score "64"...and my stomach dropped. But then I realized that was the national average and right above it was my score: 86.7. I said to myself "That's too good to be true. It can't be right." I went and checked out of the testing center and the woman said "You made an 86.7". I almost started crying. I was shaking I was so happy. I immediately went and applied to the program.
A week later an envelope arrives at my parent's house. I get there the next day and open it up. I read one word "Congratulations", then stop reading and start screaming and jumping up and down. My mom comes over to me and I hug her and start crying tears of joy. It finally happened.
 |
| I got accepted into PTA school! |
I already sent in an email accepting my seat, one of only 24 in the program. I have to sign up for a mandatory orientation session. There's 2 options and both are during the day: Tuesday, July 1 @ 9-11:30a or Wednesday, July 2 @ 2-4:30. I hate that I have to ask off work for one of those.
Then all that's left is getting financial aid, which still hasn't come through, even though I applied for it at GTCC in January. Because I have a Bachelor's Degree, I can only get loans from a community college, no free money. I will not be working while I'm in school, so I have to get a private student loan from the bank as well to cover living expenses.
I am beyond happy right now and can not WAIT to begin this journey. I feel like my life is complete now.
I am beyond happy right now and can not WAIT to begin this journey. I feel like my life is complete now.
Thursday, June 12, 2014
Pre-Agility: Week 2
Week 3
Week 4
Week 5
Week 6
The weather held out so we had agility class tonight at Dog-Gone Fun in Kernersville.
We did some review with the tunnel. Buster didn't do as well as he should have because I didn't give the right signals. But he did go through it enthusiastically once he knew that's what I wanted and that's what counts, that he has fun.
Today we were introduced to the tire and the chute.
 |
 |
 |
| Agility chute |
The tire was lowered until it was barely off the ground. So I just put Buster in a sit-wait, walked to the other side of the tire and called him through. Again, he came to me enthusiastically.
I thought the chute might be scary, afterall, it's closed at one end. You can't see where you're going. But we put our dogs on one end, then went over, lifted the chute up so they could see us and called them through. Buster came right through and even when the chute was down on the ground (as pictured above) he ran through it blindly. I was so proud of him. My baby is fearless!
We ended by doing some contact work on the A-Frame. It's important that their paws touch certain parts of the equipment for safety and so they don't get disqualified.
As we started this, a light rain started, so we hurried through and went on our way.
Before we left, Buster and I signed up for an Agility Foundations Workshop. It's 2 hours and we'll learn "backing up/backing onto an object, step onto/circle an object, beginning shadow handling, flat work, acceleration & deceleration." I hope this will help us advance faster and give us an edge. My goal is to participate in the June 2015 Triad Dog Games.
(Buster already knows the command "back up"; we learned it the last day of Advanced Obedience. We practice that one a lot. It's very useful.)
There's a lot about agility that confuses me. Some of the terminology is confusing, especially regarding cross-overs and handling and whatnot. When I was at the Triad Dog Games I saw teams go on some equipment more than once during their run. There was a confusing mixed-up pathway. Why is it all mixed up? Does someone give the participants specific instructions about what path to take in the course?
The description for the Agility 2 class at Buster's school says: " Handlers and dogs will learn how to maneuver serpentines, threadles, wraps, 270′s, lead out pivot’s/reverse flow pivots and layering of obstacles. " I don't understand ANYTHING in that sentence. (I'm sure I'm gonna read this post in the future and think I was dumb for being confused.)
The description for the Agility 2 class at Buster's school says: " Handlers and dogs will learn how to maneuver serpentines, threadles, wraps, 270′s, lead out pivot’s/reverse flow pivots and layering of obstacles. " I don't understand ANYTHING in that sentence. (I'm sure I'm gonna read this post in the future and think I was dumb for being confused.)
Stayed tuned for Week 3 (halfway done) next week, if the weather holds. Hope there's no midterms!
Richmond, VA
A friend of mine, Analise, moved to Richmond, VA recently. She put herself through college and graduated from UNCW and intends to go to VCU for a Master's in Social Work. So proud of her!
She graciously allowed me to come visit her and showed me around. I arrived about 1:30p on Sunday June 8. Brought my stuff in and we went out to lunch at City Dogs on E. Cary St. I liked their fries and shake but was not impressed with their dog. It was actually one of the worst dogs I'd ever had. Go figure!
Then we walked around downtown and I learned there is a river running through the city: the James River. Who knew?! I wanted to take the Canal Cruise, but Analise wasn't interested, so we strolled.
Later that evening, we went to one of the top ten doughnut shops in the country, Sugar Shack. We showed up about 5 minutes before closing and each asked for 2 doughnuts. The lovely employee said "It's almost closing, I'll just fill in the rest and give you a dozen." So we got 6 free doughnuts. Their maple doughnut is TO DIE FOR and I don't even like doughnuts that much.
The little girl buried by this dog loved this statue so much, her grandfather bought it for her. When she died of scarlet fever, he put it by her grave to prevent it being melted down for metal during the Civil War.
We soaked our feet in the James River and made our way back, which took longer than expected after a shortcut proved unsuccessful and we had to double back. But eventually we made it to the car and off to dinner at The Galaxy Diner, which was DELICIOUS. Highly recommend!
We saw Poe's writing desk. The back of the chair is cut to encourage Poe to sit up straight.
And then we took a final picture in the gift shop amongst the ravens.
I stopped off at the Sugar Shack again to pick up another half-dozen of doughnuts to bring back to my dad to thank him for watching my dog, Buster.
She graciously allowed me to come visit her and showed me around. I arrived about 1:30p on Sunday June 8. Brought my stuff in and we went out to lunch at City Dogs on E. Cary St. I liked their fries and shake but was not impressed with their dog. It was actually one of the worst dogs I'd ever had. Go figure!
Then we walked around downtown and I learned there is a river running through the city: the James River. Who knew?! I wanted to take the Canal Cruise, but Analise wasn't interested, so we strolled.
 |
| Riverfront Canal Cruise |

The first geocache we tried for required we go visit a specific grave, gather some information and then use it to go to the final stage to find the actual cache, which we eventually found.
 |
| The first cache site |
The little girl buried by this dog loved this statue so much, her grandfather bought it for her. When she died of scarlet fever, he put it by her grave to prevent it being melted down for metal during the Civil War.
We continued our walk through the cemetery and stopped by Jefferson Davis' statue.
 |
| Our poses were supposed to match. I didn't angle myself right. |
Then we moved to the trails past the cemetery to find the next cache at Texas Beach. Analise had heard about this place, even written it down, but had never been. We learned a lot on this hike. It was a very, very long hike. There were not clear markings from the cemetery to the Beach so we actually went much further than we needed to. We ended up in a parking lot, but that lot had a map. So we jumped on another trail that crossed paths with the other, then went up and across a large metal bridge.
We saw a truck driving on the train tracks, without tires, as we descended the many, many stairs. But FINALLY, we arrived at Texas Beach and made a quick find of the cache.
 |
| The beautiful Texas Beach |
We soaked our feet in the James River and made our way back, which took longer than expected after a shortcut proved unsuccessful and we had to double back. But eventually we made it to the car and off to dinner at The Galaxy Diner, which was DELICIOUS. Highly recommend!
Tuesday we made some homemade cinnamon rolls and then went to the Edgar Allan Poe Museum.
 |
| Poe statue in the garden |
 |
| Poe's Writing Desk |
And then we took a final picture in the gift shop amongst the ravens.
 |
| Nevermore |
I stopped off at the Sugar Shack again to pick up another half-dozen of doughnuts to bring back to my dad to thank him for watching my dog, Buster.
 |
| Clockwise from top L: Caramel drizzled cinnamon bun, chocolate glazed, oreo crumble strawberry glazed, salted caramel, original glaze, salted caramel |
I had a ton of fun in Richmond. I hope to make another trip up there in the future and then continue on with Analise to DC and Baltimore, Maryland.
Subscribe to:
Comments (Atom)